This tutorial will demonstrate how to add a sun or object behind the white mission building. This is a good lesson in how to make proper selections by using various selection tools, including the illustrious quick mask mode. You will also see the benefit and practicality of using layers.
Original Image: (You can click on it and save this image if you would like to work with me)

Step One, Making an initial selection:
What I would like is to have a sun shining behind my building. The best way to do this is put the building on a new layer of its own, so that I can
place a sun right behind it and move it around if I would like. It might be faster to select this sky in this picture because the sky has a relatively uniform, solid blue color - a perfect reason to use the Magic Wand Tool.
Select the Magic Wand Tool by choosing it on the toolbox, or simply press "W" on your keyboard.
If you click on the blue of the sky, you will notice that it didn't do a perfect job of selecting the sky, the reason is because there is most likely a checkbox at the top called "contiguous" that is currently checked. This is telling photoshop that you only want to select pixels that are touching eachother.
After you UNCHECK CONTIGUOUS, when you click on the sky, you are telling photoshop that you would like to select that blue color all over your image whether the pixels are directly touching each other or not.
If you click on the sky now, it is able to select the areas in the bell windows, as well as to the lower right where the tree branches are. Your selection should now look like mine:
Step Two, Refining Selection with Quick mask:
Quick mask is another way to make selections.
It's more creative and intuitive you just need to know how it works and it might become your favorite way to select.
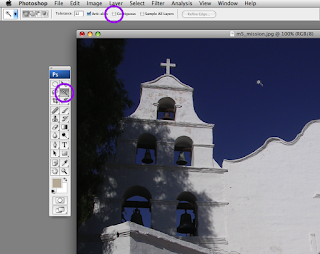
First of all, I'll show you what happens when I click the quickmask button. It looks like this on your toolbar:

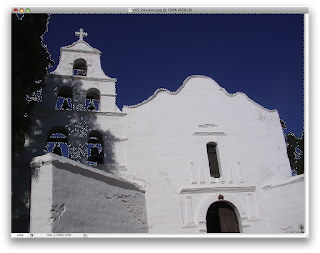
When you activate quick mask mode (either by pressing on the quickmask button shown above or pressing "Q" on your keyboard) photoshop takes your current active selection and turns it red. Your screen should look like mine: If it does not, read further.

If your building is red and not the sky, it's because of a simple setting that you can change. To change the setting: Double click on the quick mask button. You will get the following dialog box. Make sure that Color Indicates "selected areas" and NOT "masked areas."

You will have to click on the quick mask button again after changing this setting to get into that red mode. Just for fun, click the quick mask button on and off just to see that the red area will become your selected area. Now comes the fun part, you can add to and subtract from the red areas NOT WITH THE ERASER, but with a regular paintbrush and some Black & White paint. Wherever you paint black, it will add to your selection - therefore appearing like you are painting more red. Wherever you paint white - what do you think will happen? -It will take away from your selection!
Now let's refine our red areas, select the brush tool ("B" on your keyboard) and start painting with white over the areas we don't want selected (like on the bell tower on my image)

I'm now going to further refine my selection around the tree branches, using small brushes to really get it perfect.

Ok, now that i've refined my selection, it's time to get out of quickmask mode. Simply press Q on your keyboard, and watch what a beautiful selection you have.
Now here's the catch: In order to put a sun Behind the building I need to make a copy of the building and paste it on a new layer. What's the deal - We've pretty much selected everything but the building! That's ok, it's so simple. we simply need to invert our selection, and you access it up in the Selection menu:

Now your selection should look like mine:

Step Three, Duplicating the pixels within your selection
I want to duplicate the building and put it on it's own layer Above the background layer. Why? Because we're going to put another layer sandwiched between those layers and put a little happy sunshine on it, that's why.
How do you do this? Well, make sure the background layer is active (by clicking on the word "background layer" on the layers pallet and pressing "Command J" on your keyboard. Your layers pallet should now look like mine, but nothing will look different about your image.

Step Four, Creating the sun on a new layer:
Click on your background layer to make it active (the layer on the pallet should be highlighted in blue) and click on the New Layer button (down at the bottom of the pallet next to the trash can) You should have a brand new layer called "layer 2" with nothing on it. (If it is not sandwiched between the two existing layers, you can drag it down in the hierarchy of the layers on the pallet itself)

Now with your middle layer active, time to make your sun. Just use the elliptical marquee tool, changing its feather to "10 px" drag a perfect circle by holding down Shift while you drag, fill the selection with your color. Now the magic is that you can then choose your move tool (by pressing "V" on your keyboard) and you can move the sun around to anywhere you like.

That's it! I should let you know that while you're editing in quick mask mode, feel free to lower the opacity of your brush... When you change it into a selection, it will retain the transparent quality that you used when you painted!
- If you have any questions or feedback, feel free to comment.
3 comments:
This is really awesome! Thank you.
Its good to know that u are still teaching me even from SF. BTW brandy is still raving about you.lol
I remember this.
Post a Comment